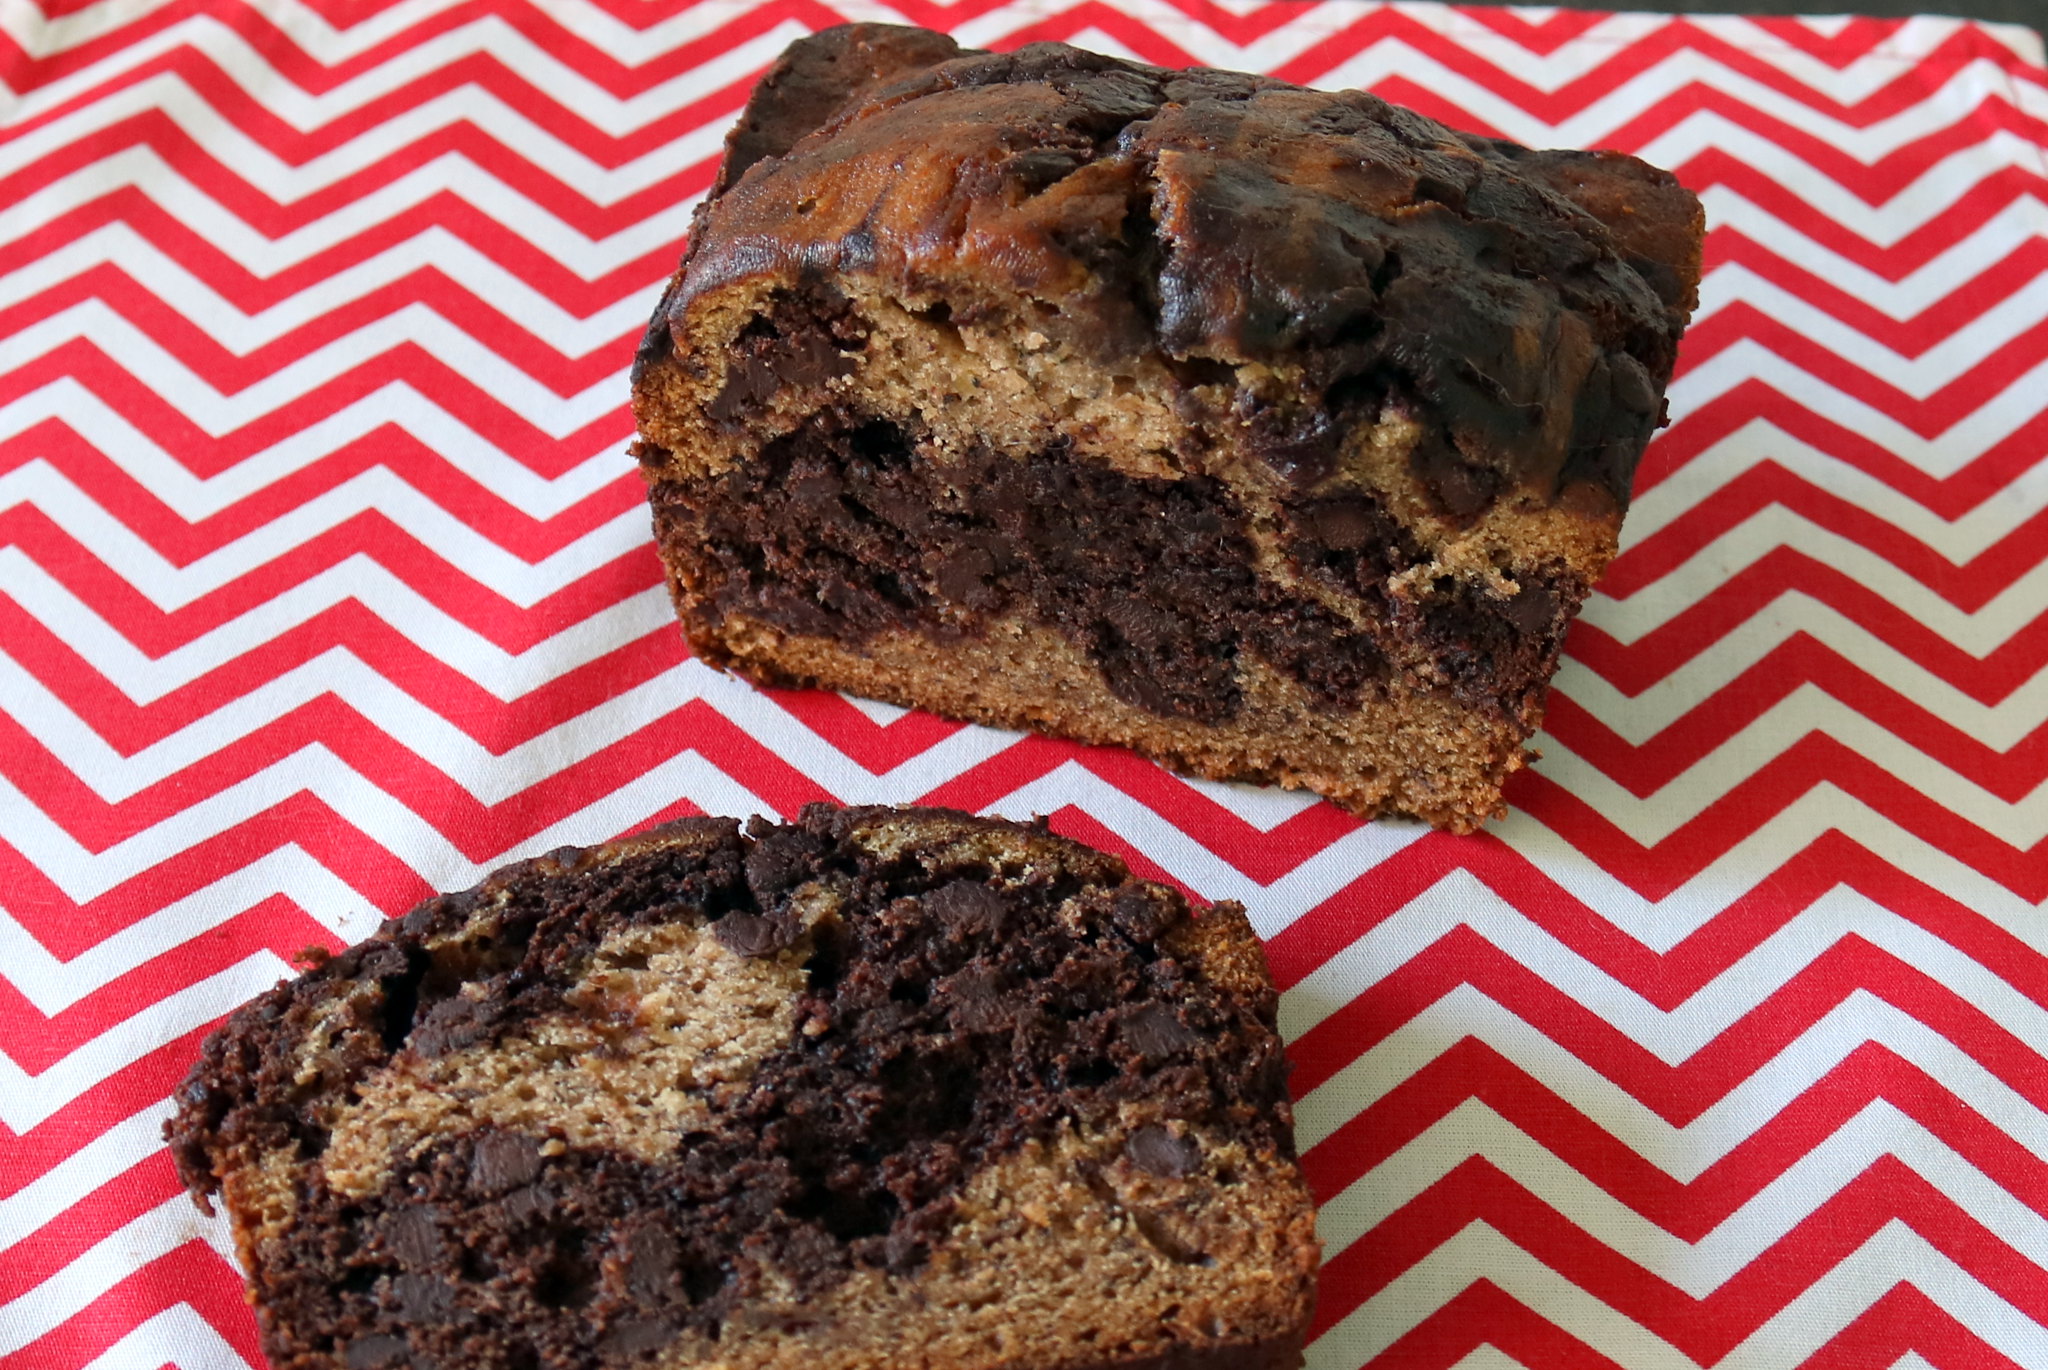
Marbled Banana Chocolate Bread
I hardly ever buy bananas here in Uruguay. When you’re used to Brazilian bananas, you don’t really care for the Ecuadorian ones, which have to be harvested much earlier than ideal to arrive here fresh.
“Hardly ever” doesn’t mean “never,” so I had bought some the other day and dumbly forgot about them! I’m still not sure how that happened, but that’s ok, because overripe banana means banana bread, one of the tastiest things you can bake!
Looking for a new take on it, I found this recipe by Deb, which seemed pretty much infallible: it’s banana and chocolate! Marbled! It was so tasty that, less than a month after the first try, I bought bananas again and let them get overripe ON PURPOSE, so I could bake this again! 🙂
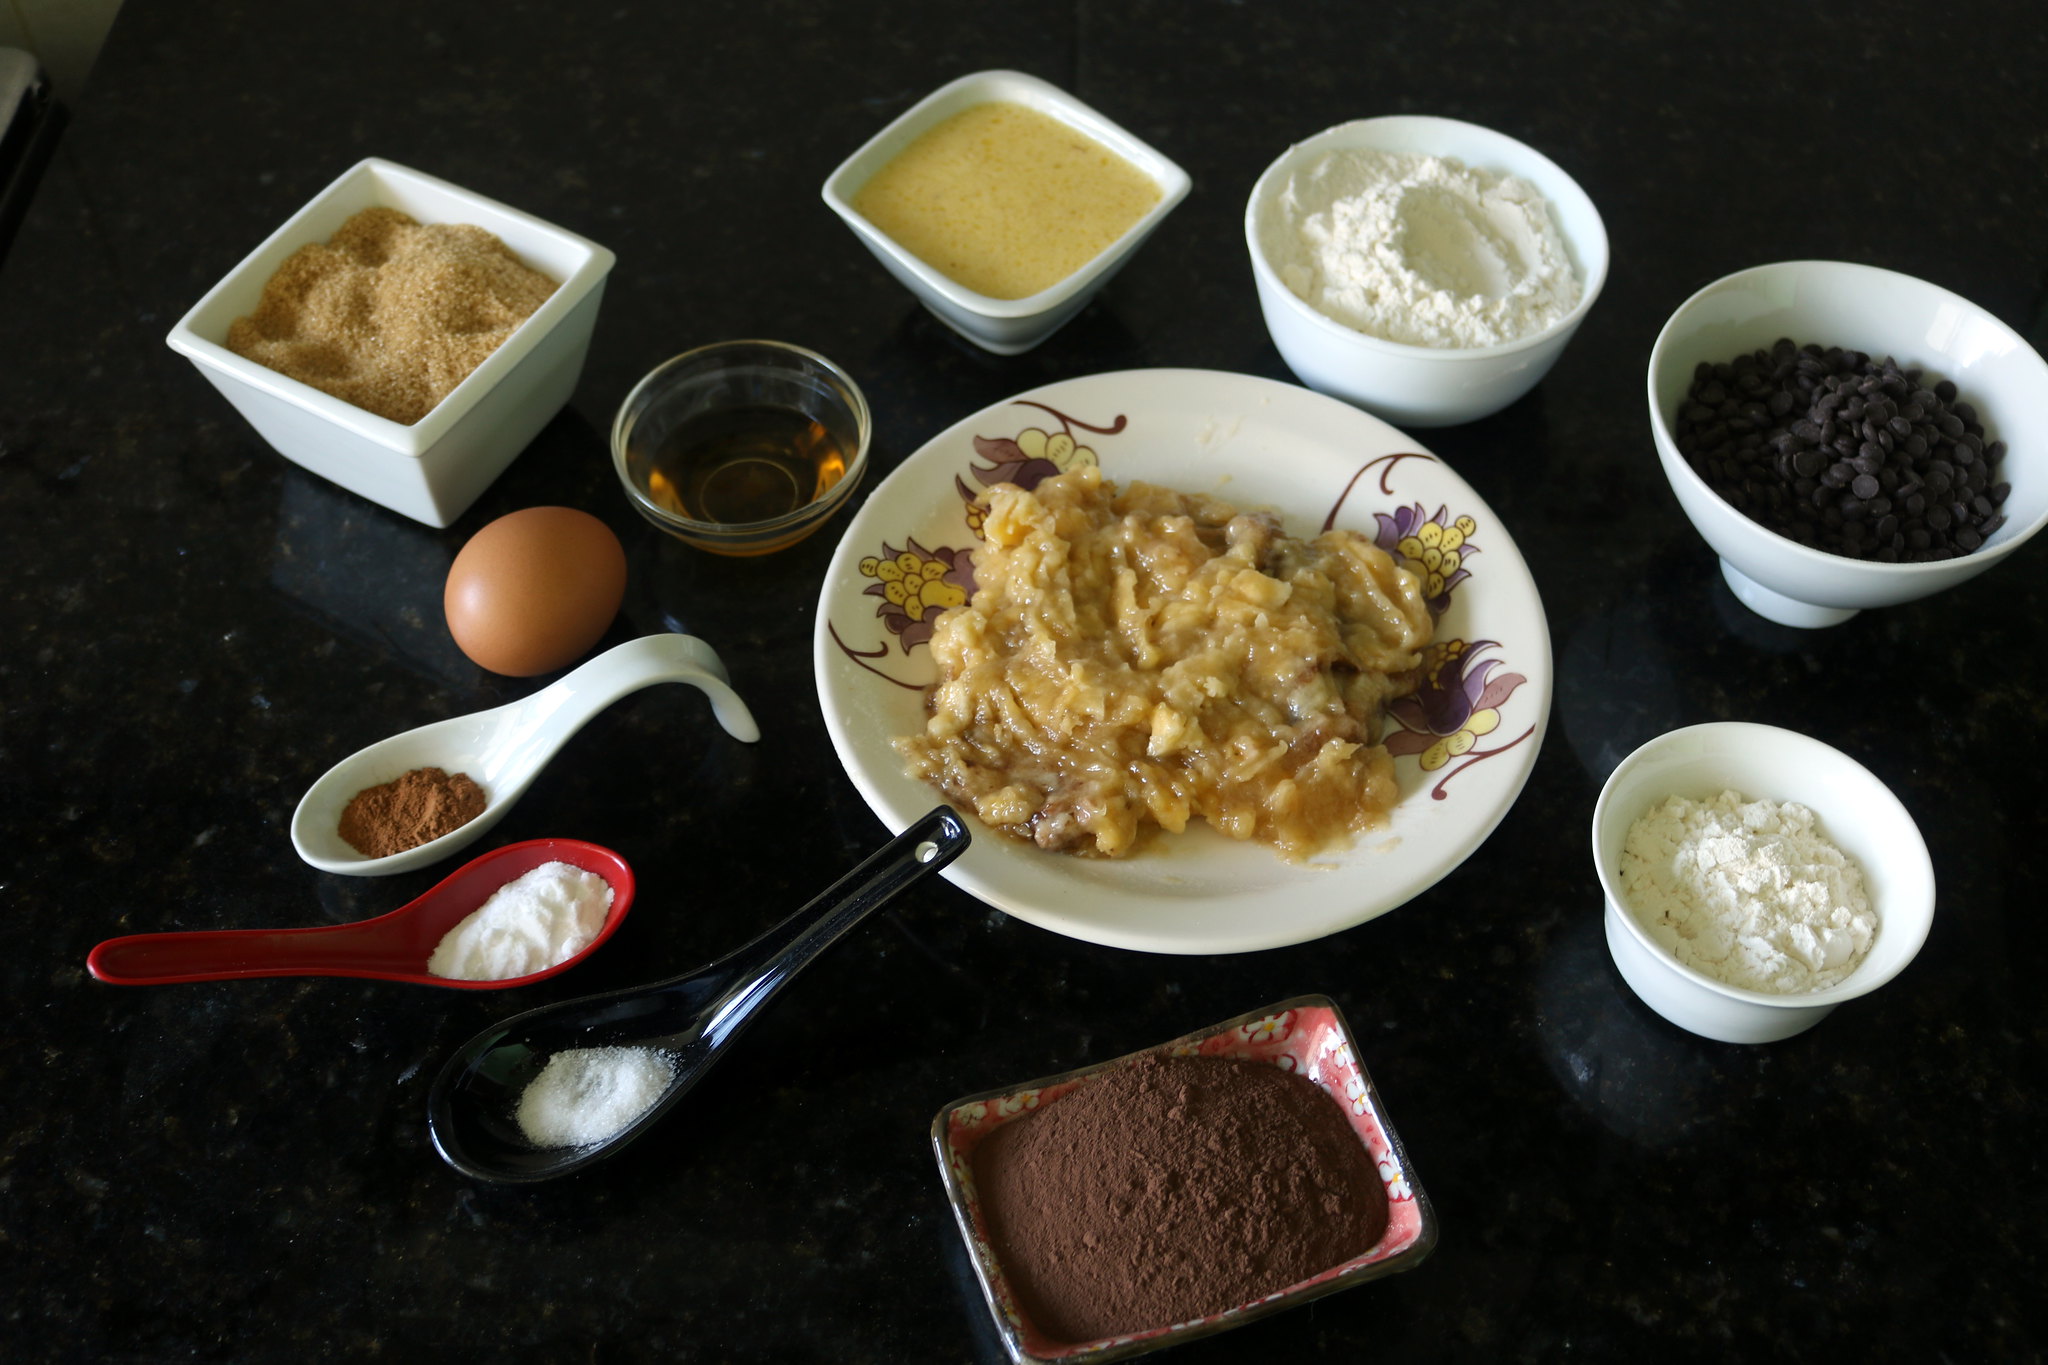
3 large and veeeeeeery ripe bananas – you know, the ones you considered tossing? Those.
115 g (1/2 cup) unsalted butter, melted – well, I only buy unsalted butter, but if all you have is salted butter, don’t worry: just don’t add salt to the batter.
145 g (3/4 cup) brown sugar
1 large egg
1 tsp vanilla extract
1 tsp baking soda
¼ tsp salt
130 g (1 cup) + 35 g (1/4 cup) flour – leave those separate, they’re used at different steps!
½ tsp ground cinnamon – you know me: I used about 1 tsp allspice instead 😀
20 g (1/4 cup) unsweetened cocoa powder
130 g (3/4 cup) chocolate chips – I used the mini chips, with 50% cocoa, but next time I’ll use a darker chocolate, chopped.
As in most cake recipes, I started by pre-heating the oven to 180 C (350 F) and greasing the pan – in this case, a 9×5 loaf pan.
In a medium-sized pan, melt the butter. In that same pan, mash the bananas very well. Add the brown sugar, egg, vanilla, baking soda, and salt, and mix thoroughly using a rubber spatula. Add 1 cup of flour, mixing until you can’t see any specks of flour.
Pour half of the batter into a bowl – I totally eyeballed it, but you can be a proper baker and weight it. To one half of the batter, add the remaining ¼ cup of flour and ground cinnamon, mixing well. To the other half, add the cocoa powder and chocolate chips.
Now it’s time to create the marble effect: place dollops of dark and white batter in the pan, as in a checkerboard. You’ll probably need to add a second layer of batter, so the top layer should be opposite the bottom: place a dollop of white batter over the dark batter, and vice-versa. Then, push a butter knife (or an offset spatula) until the bottom of the pan and drag it in a wave motion from one side of the pan to the other, just once – this way, you’ll get a marbled batter and not make it all one flavor!
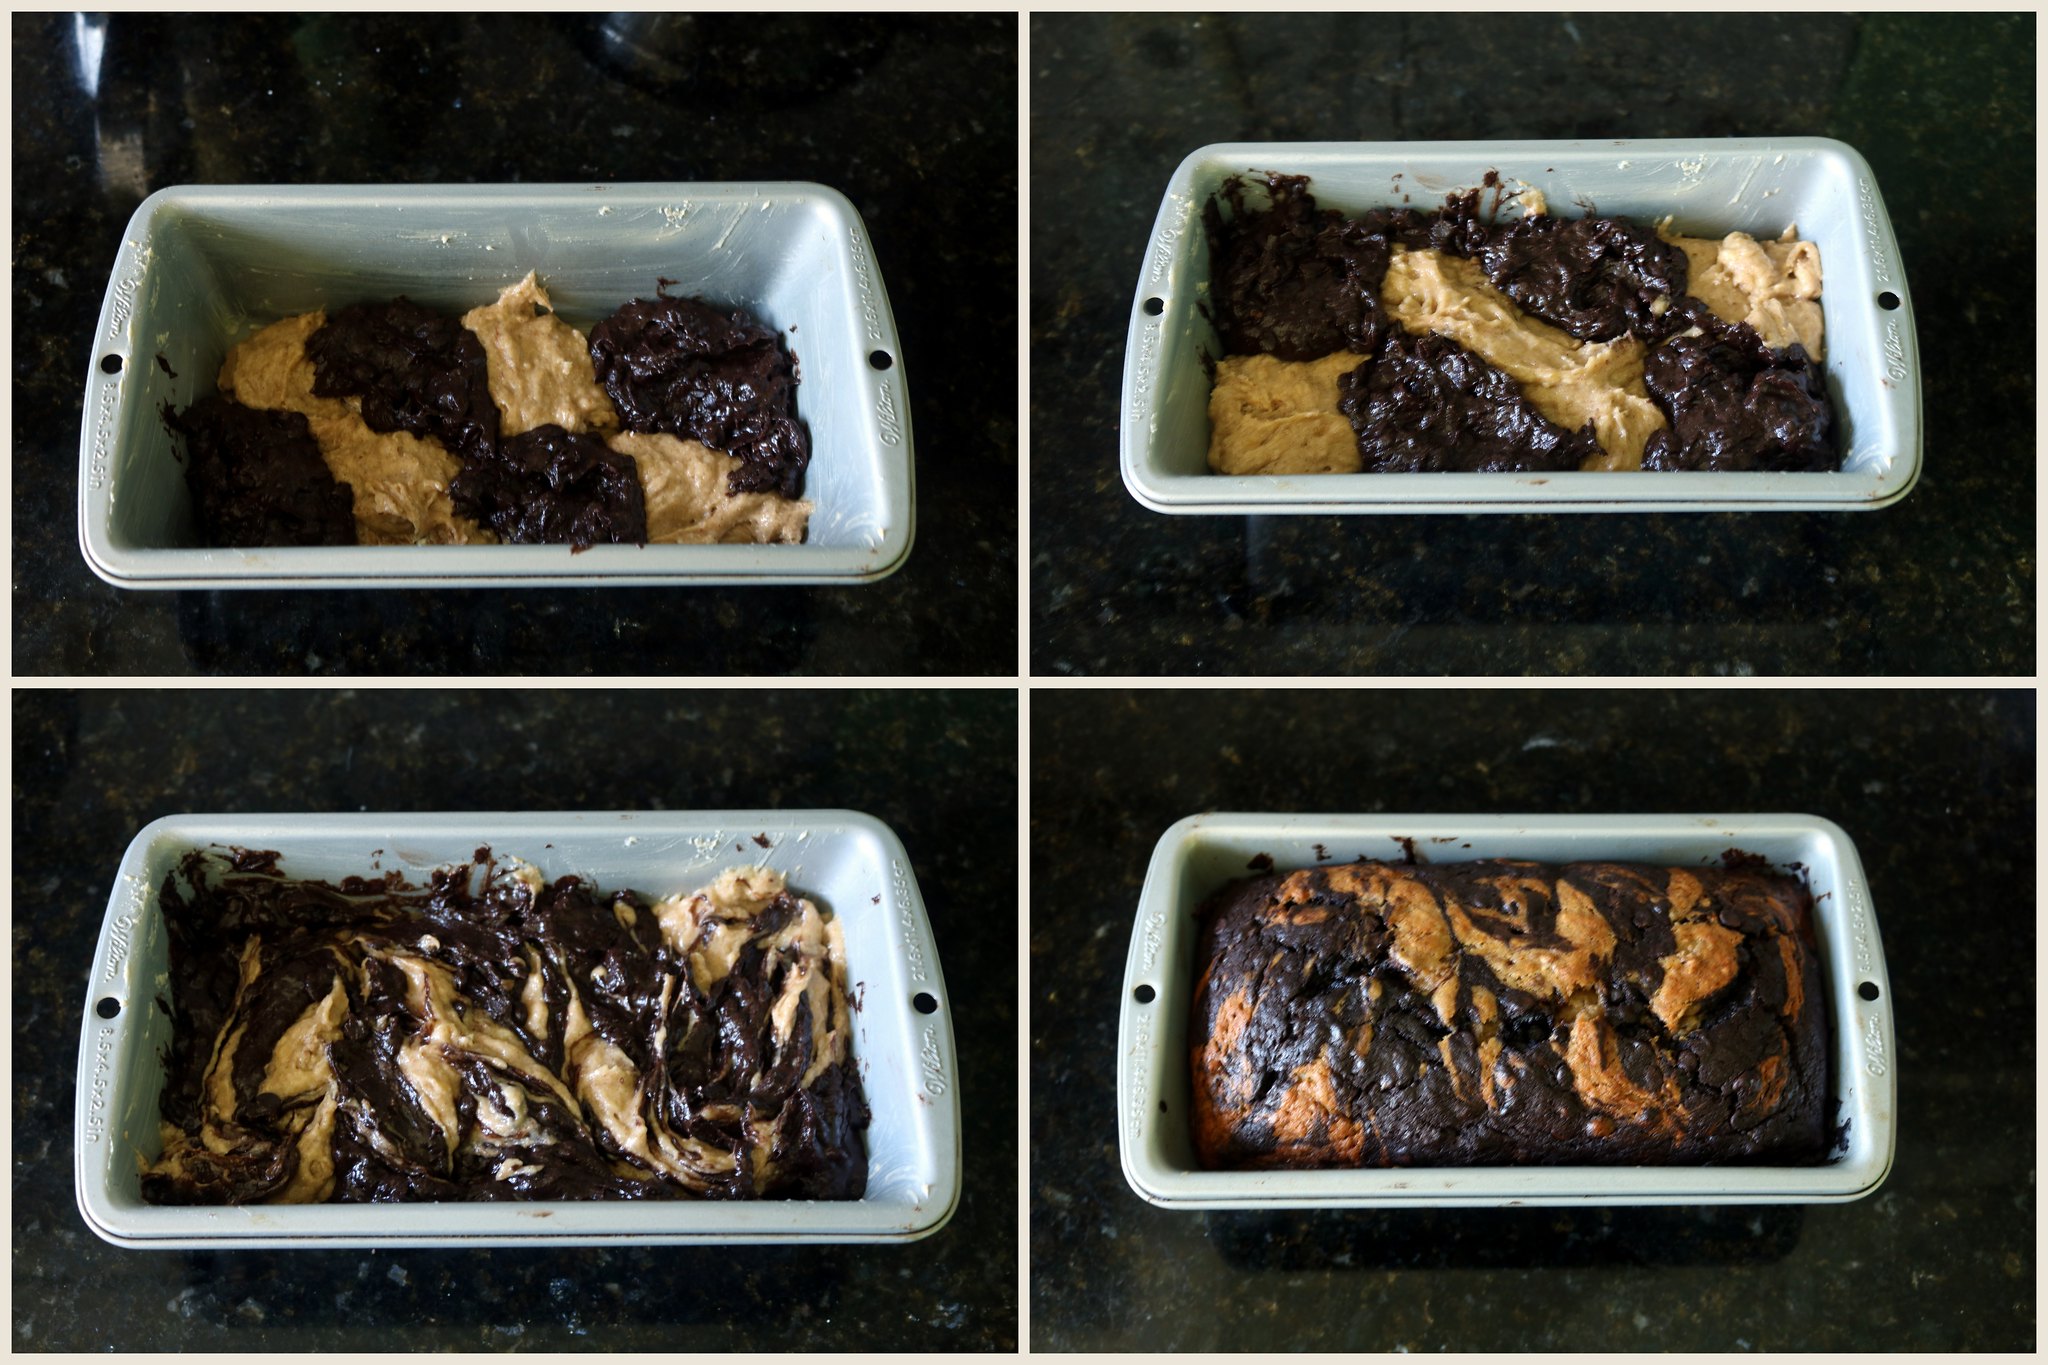
Bake for approximately one hour, or until a toothpick inserted in the middle comes out clean – be careful not to confuse melted chocolate chips for raw batter! Let it cool for about 10 minutes, then run a spatula around the pan, remove the bread from it, and let it cool over a wire rack. I like to serve it warm, but it is great at room temperature too!
FREEZER: This freezes perfectly. I usually let it cool completely before slicing it and placing in a Ziploc bag. Freeze for up to 3 months.
Lemon White Chocolate Coconut Cookies

White chocolate is one of those things that I only learned to enjoy as a grown-up. The first step was not thinking about it as chocolate (because then dark chocolate wins!), but as a tasty treat! Unfortunately, a lot of brands have hydrogenated fat, which makes them quite icky. One of these days, I bought a fancy Belgian one and I kept thinking how great it was! It was time to look for some recipes, such as this one from The Baker Chick.
Despite the white chocolate, these cookies aren’t overly sweet. Together with a fresh cup of coffee, these were a hit!
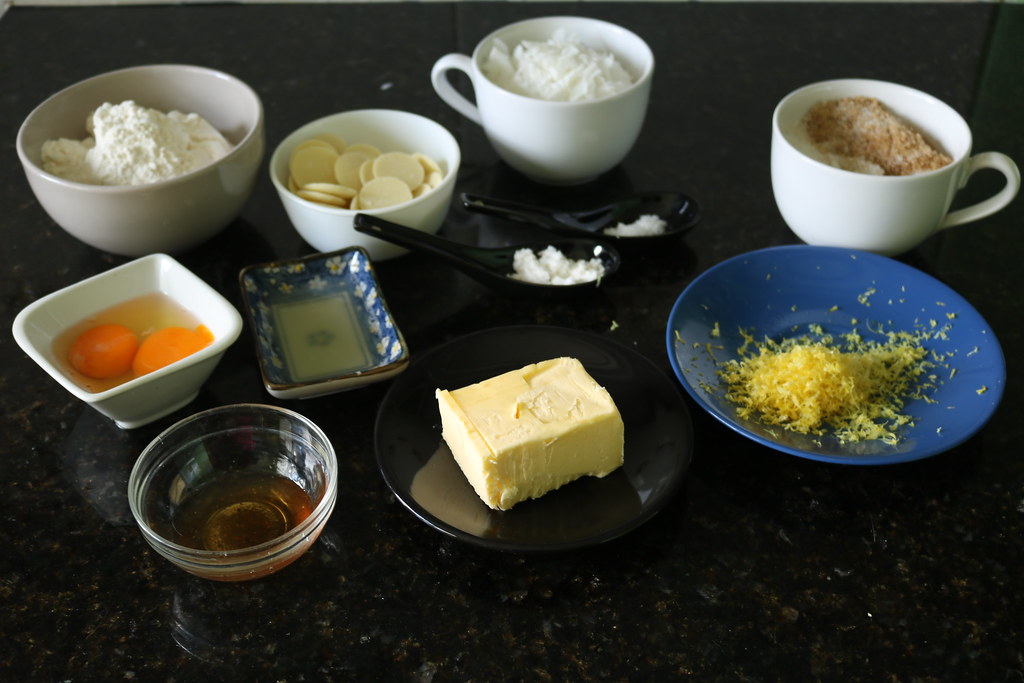
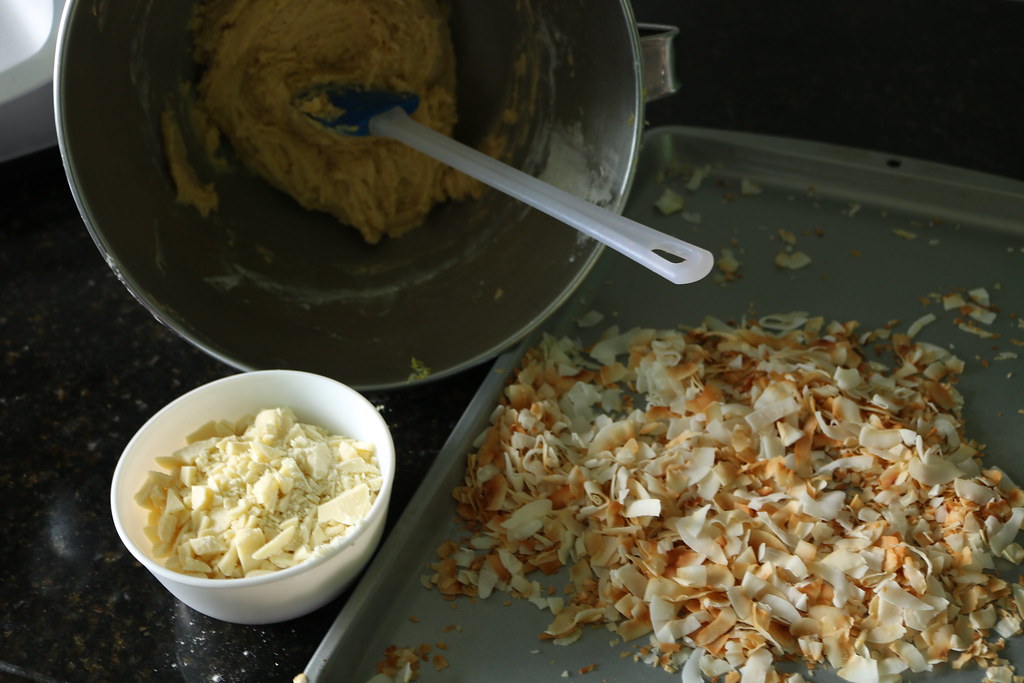
1 ½ cups sweetened coconut flakes – I used unsweetened coconut flakes and I thought the cookies were sweet enough!
1 ¾ cups flour
½ tsp baking soda
¼ tsp salt
113 g unsalted butter, room temperature
½ cup brown sugar – press the sugar when measuring
½ cup white sugar
1 egg and 1 egg yolk
1 tsp vanilla extract
Zest of 1 lemon
2 tsp lemon juice
113 g white chocolate, chopped
Spread the coconut flakes on a baking sheet and toast in a pre-heated oven for 5 to 10 minutes, stirring well every 2 minutes, until the coconut is golden. Set aside the coconut, but don’t turn off the oven.
Cover the cookie sheets with parchment paper – I used a Silpat.
In a small bowl, whisk together the flour, baking soda, and salt. In the bowl of your stand mixer, place the butter, brown sugar, and white sugar, and mix until they are well combined. In cookie recipes, I try to avoid over-beating the butter. Add the egg, egg yolk, vanilla, and lemon zest and juice, and combine the ingredients using a silicone spatula.
Add the dry ingredients, mixing until you can’t see any flour specks anymore. Finally, add white chocolate and the toasted coconut, and mix well with the spatula.
Use a cookie scoop to portion the dough, or simply make small balls of dough (1 Tbsp). Place them in the cookie sheets, leaving about one inch between them – they spread a little bit in the oven.
Bake for 10-12 minutes, or until the edges are slightly golden. Carefully remove them from the cookie sheet – they will be kind of soft! – and let them cool completely on a cooling rack.
Tip: If you’re using the same baking sheet to bake multiple batches, cool it before adding the second batch, so that the cookies won’t spread too much in the oven. I usually remove the baked cookies (and the parchment paper, obviously) and place the sheet under running tap water for a few seconds, until it’s cool enough for me to touch it with my bare hands. Then, I dry it with a cloth and it’s ready for the second batch!
Freezer: If you don’t want to bake the entire batch on the same day, flash-freeze the dough balls on a tray. When they are completely frozen, transfer them to a Ziploc bag – they’ll last up to three months in the freezer. To bake, place the frozen balls on the prepared baking sheet and bake for a few extra minutes! It’s that easy!
Strawberry Cake
For Easter, I decided to unleash my inner hipster and make a chocolate-FREE dessert! The strawberries at the supermarket looked inviting, so I decided to bake this cake that I had seen made by Paula from The Cookie Shop and Deb from Smitten Kitchen, all based on Martha Stewart’s recipe! 😀
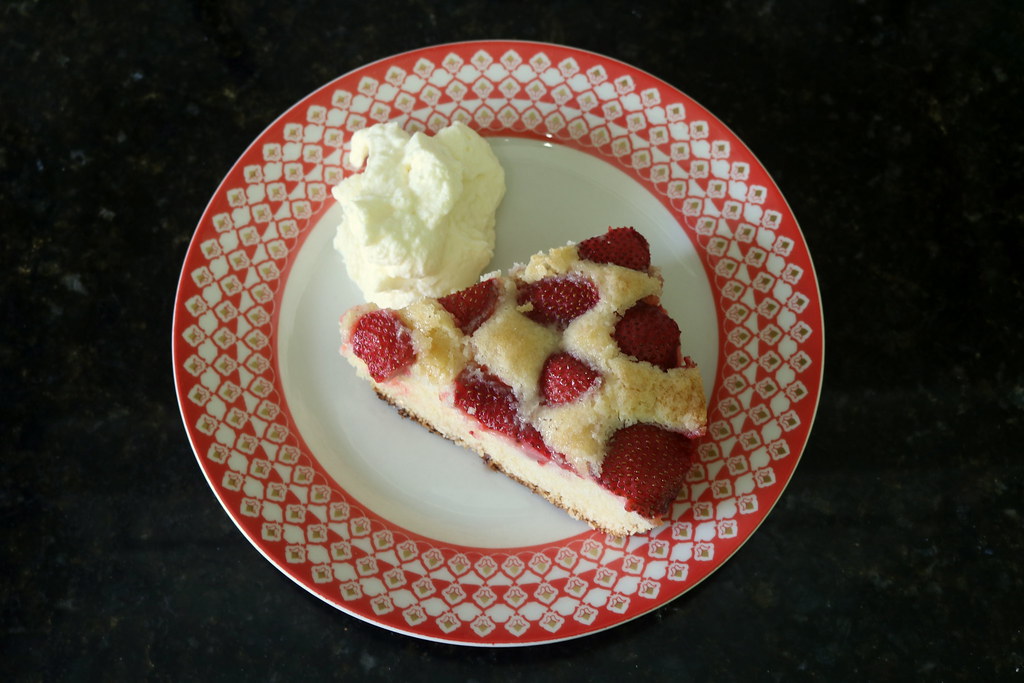
This cake is everything you want from a strawberry cake. I hadn’t had such a good cake – and such a pretty one – in a long time! The best thing is that it’s not very hard; actually, it comes together reasonably quickly.
When the cake came out of the oven, Sky asked me: do we have cream? I opened the fridge and saw a small package of cream. I whipped it to serve with the cake, making our dessert even richer!
For a 10-inch cake, you’ll need:
85g (6 Tbsp) butter, softened
200g (1 and 1/2 cup) flour
1 1/2 tsp baking soda
1/2 tsp salt
200g (1 cup) sugar, plus 2 Tbsp to sprinkle over the cake – I used regular sugar in the batter, and turbinado sugar to sprinkle over the cake
1 large egg
1/2 cup milk
1 tsp vanilla extract
400 g strawberries, hulled and halved
Butter a 10-inch round pie plate and pre-heat the oven to 180 C (350 F). It is such a quick process that I actually started pre-heating the oven before making the batter 😀
Start by sifting together the flour, salt, and baking powder. I must confess I never sift – I follow Chef John’s trick of whisking them thoroughly for 2 minutes. This gets rid of any lumps and saves me from having to wash the sieve! 😀
Using your stand mixer, cream the butter with the sugar. The recipes usually say something about “mix until the cream is pale,” but Uruguayan butter is pretty yellow, so that never really happens – it has never stopped me from baking anyway, though!
Add the egg and mix well. Then, add the milk and vanilla, mixing well. At this point, the mixture looked a bit curdled, which is normal for this kind of cake.
As usual, to avoid over-mixing the batter, at this stage I change to a hand whisk. Add the flour mixture little by little, mixing just until you can’t see any flour specks.
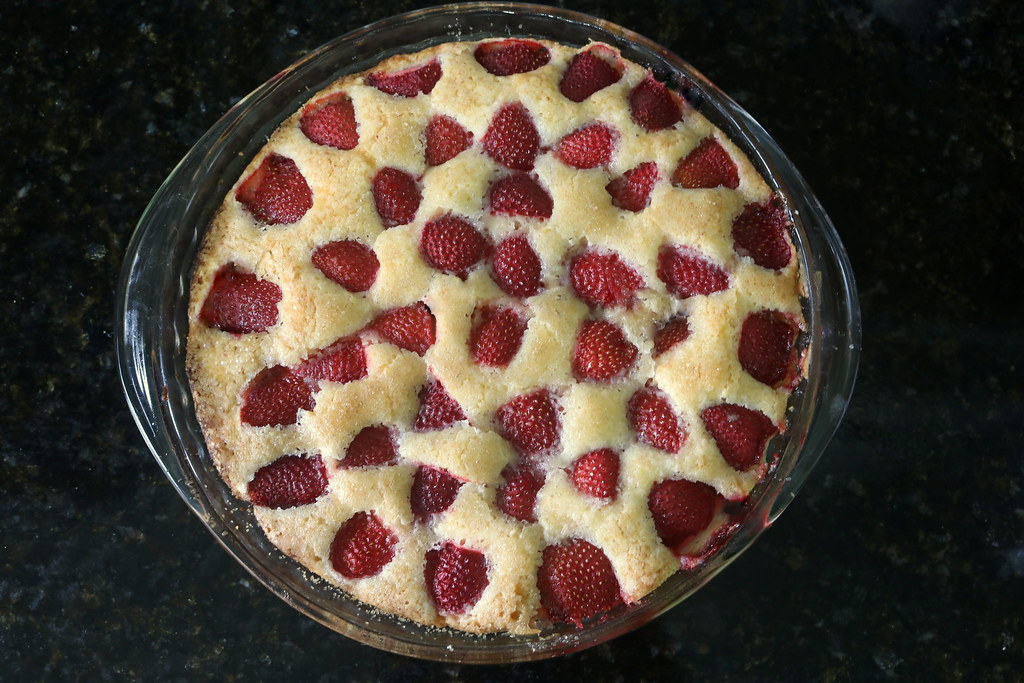
Transfer the batter to the buttered pie plate. Place the strawberry halves over the dough, cut side down. Try to place them as close together as you can!
Sprinkle 2 Tbsp of sugar (I used turbinado) over the strawberries and bake at 180 C (350 F) for 10 minutes. Then, lower the temperature to 170 C (325 F) and bake until it’s golden and a toothpick inserted into the middle comes clean – the recipes said this would take about an hour, but in my oven it took only 45 minutes.
Let the cake cool over a wire rack and serve with whipped cream!
Panettone Muffins
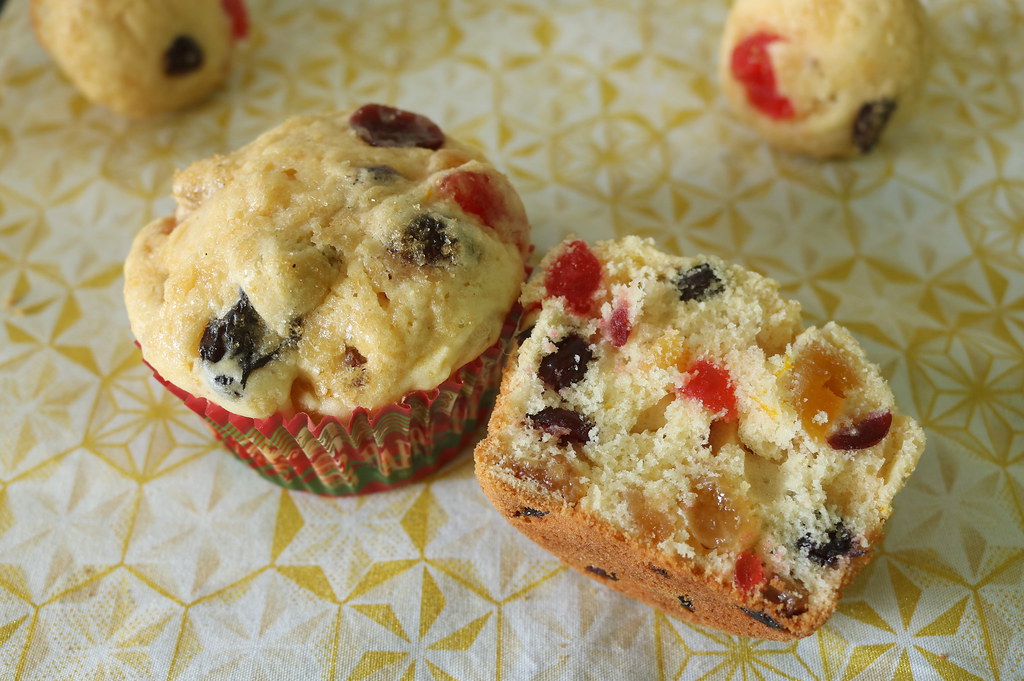
One of the things I picked up from my mom was the love for panettone – the best part of Christmas! As today is her birthday, I thought it was appropriate to post this recipe – which is much easier than the traditional panettone!
The first time I made these muffins was last Christmas. Everybody loved them, so I decided to bake them again – as they freeze wonderfully, you can bake them now, when the holiday madness is not fully on, and share them on Christmas Day!
Don’t let the ingredient list intimidate you – it’s quite long, but this is not a difficult recipe! Instead of Amaretto and Cointreau, I used almond and orange extracts. You can also replace the dried fruit for candied fruit if you prefer!
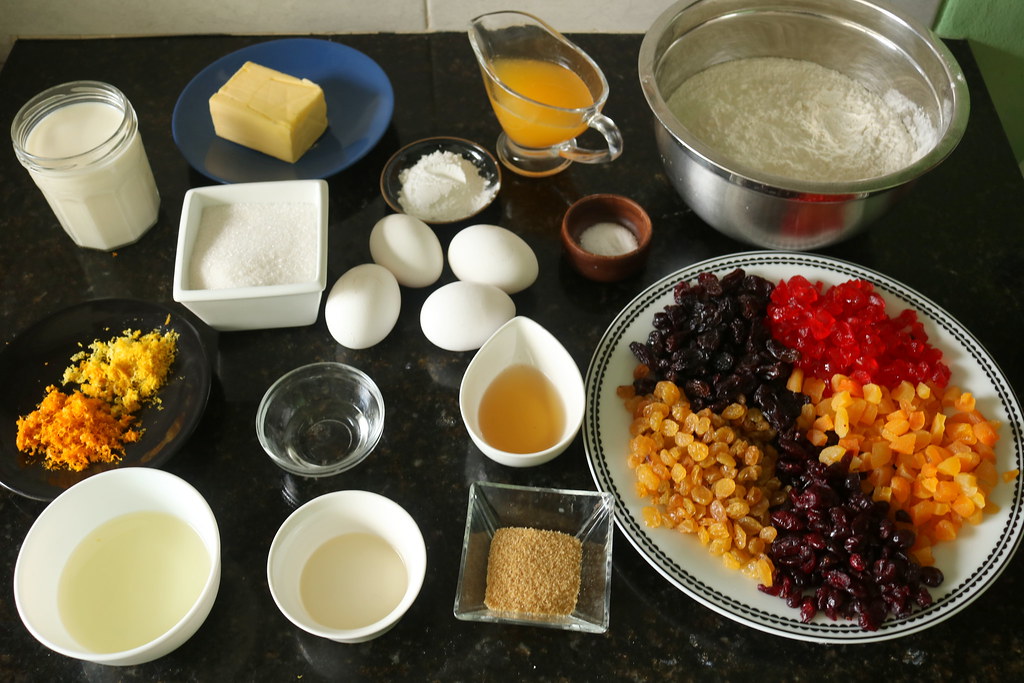
For 12 muffins, you’ll need:
1/3 cup sultanas
1/3 cup raisins
1/3 cup chopped apricots – chop, then measure
1/3 cup dried cranberries
¼ cup (60 mL) orange juice
zest of 1 lemon
zest of 1 orange
1/3 cup chopped candied cherries – the original recipe called for candied orange peel, but I couldn’t find it! 😀
½ cup (100g) sugar
¼ cup (56g) unsalted butter, softened
2 Tbsp canola oil
2 large eggs
1 tsp vanilla extract
1 tsp Cointreau – I used orange extract
1 tsp Amaretto – I used almond extract
2 ¼ cups (315g) all-purpose flour
2 tsp baking powder
¼ tsp salt
2/3 cup (160mL) whole milk
1 ½ Tbsp brown or turbinado sugar, to sprinkle over the muffins
Place the apricots, raisins, sultanas, cranberries, and orange juice in a small saucepan. Mix well and cook over high heat until the juice starts to boil. Turn off the heat and let it cool. Add the candied cherries and set aside.
Pre-heat the oven on medium. Place paper liners in a common muffin tin and set aside.
Place the sugar and the orange and lemon zest in the bowl of the stand mixer. Using your fingertips, rub the zests in the sugar, so you can extract more aroma from them – this is an optional step, but it’s so fun! Add the butter and the oil, and mix until it’s light-colored. You will need to scrape the sides of the bowl with a silicone spatula every now and then.
Add the eggs, one by one, mixing well after each addition. I always do that, but I must say I have no idea what happens if you add all the eggs at once! Hahahahahah!
Add the vanilla, the Cointreau (or orange extract), and the Amaretto (or almond extract). Mix well.
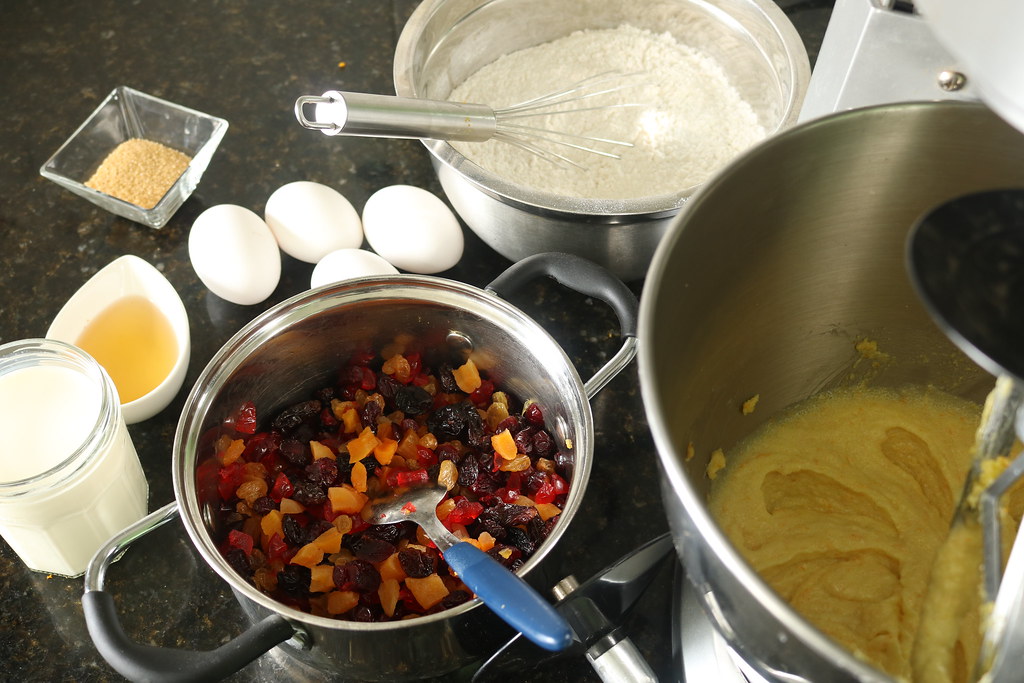
In a bowl, whisk the flour, baking powder, and salt. Add 1/4 of the flour mix to the batter, mix well, add 1/3 of the milk, and mix well. Repeat until you finish both – the flour mix will be the last thing you’ll add.
Add the reserved fruit, together with whatever orange juice is left in the pan. Mix into the batter with the silicone spatula.
Split the batter among the tins. Sprinkle the brown sugar over the muffins, and bake for about 20 minutes, or until they pass the clean toothpick test.
Let them cool on a wire rack. When they are completely cooled, place them in a pretty box/bag and give them away! 🙂
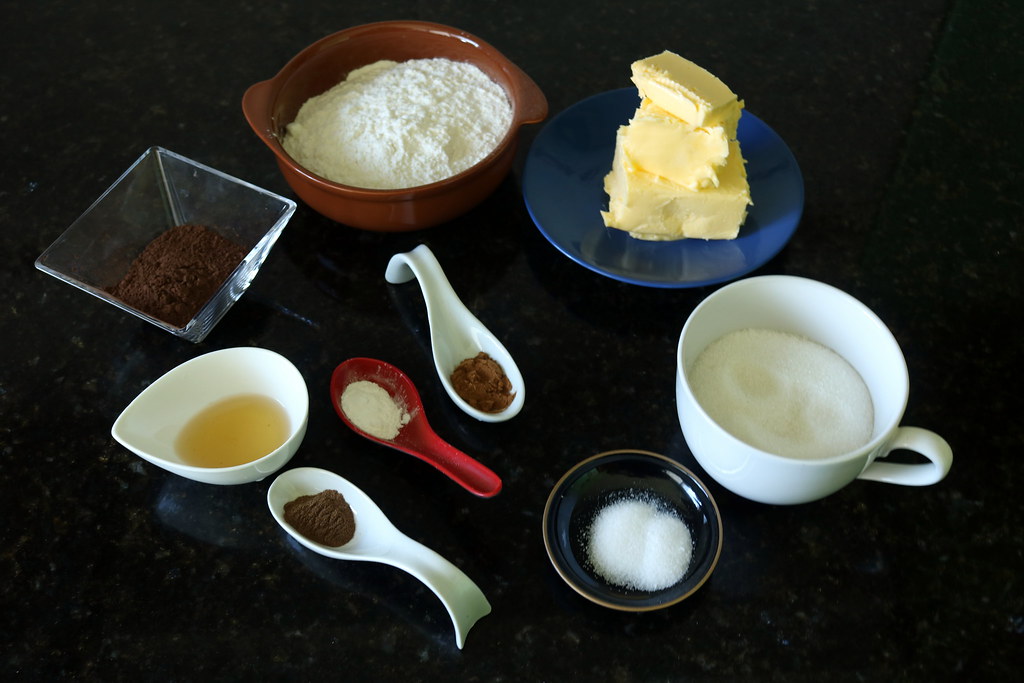
Spiced Chocolate Shortbread
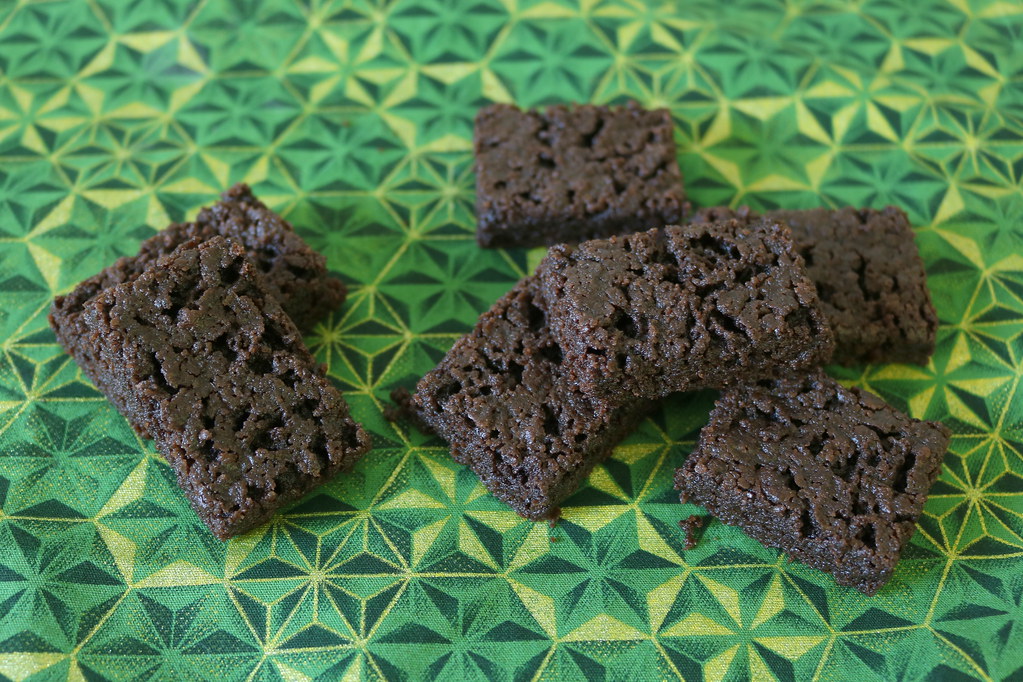
Here at Culinary Tertulias, December is a synonym for edible gifts!
To start this series, I wanted to make something with chocolate and spices, Christmas-y but not overly so. I also wanted a quick and easy cookie, because I had to take SOMETHING to a meeting with friends. I found this recipe at King Arthur’s Flour and I immediately knew it was the one to make – I love shortbreads and I had all the ingredients!
I used two things that may be a bit tricky to find outside the US: allspice and pumpkin pie spice. To make this recipe, you will need one teaspoon of spices – you can use a mix of ground ginger, ground cloves, cinnamon, and nutmeg.
You will need:
1 cup (225 g) unsalted butter, softened
1 tsp salt
1 cup (200 g) sugar
1/3 cup (28 g) Dutch cocoa powder
1 tsp vanilla extract
1 tsp mixed spices – I used ½ tsp allspice and ½ tsp pumpkin pie spice, but you can also use a mix of ground ginger, ground cloves, cinnamon, and nutmeg
1/2 tsp baking powder
1 and 3/4 cup (200 g) all-purpose flour
Start by lining 2 8-inch square pans with aluminum foil, leaving some excess to help you remove the shortbreads, and grease them well. Pre-heat your oven.
This is a recipe that is stirred by hand, which sounds hard – it’s actually pretty quick and easy, if the butter is properly softened!
With a spatula, mix the butter, salt, and sugar. Add the cocoa powder, vanilla, spices, and baking powder. Mix well. Add the flour and mix just until you can’t see any more white specks.
Divide the dough into both pans – use the spatula to smooth the surface and prick it all over with a fork. Bake for approximately 30 minutes.
Remove from the oven and let it cool for 5 minutes. Use the excess aluminum foil as handles to remove the shortbread from the pans and immediately cut the shortbreads into squares. Cool them on a wire rack.
When they are completely cool, place in a cute box or bag and spread the cheer! 🙂
Ferrero Rocher Cheesecake
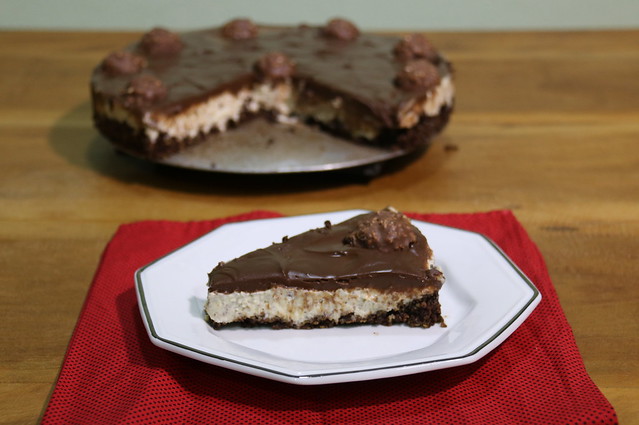
Before I went to Brasília, I made a list of the recipes I wanted to cook there for the blog – things with kale, yellow carrot, and other ingredients I can’t find in Uruguay. With everything I had to do there, I didn’t cook ANY of them! 😮 Then, we came up with the idea of a “Jota’s recipes” series, which would only feature recipes tested by my brother. We selected a few recipes and… we only cooked this one. 😦
But what a recipe! I always made the same cheesecake recipe, with ricotta, but this is a very different and tasty version – unlike what I had imagined, this is not too sweet! And you can still make it for Easter lunch! 😉
For the base:
240 g corn flakes
70 g unsalted butter, melted
4 Tbsp cocoa powder
For the filling:
200 g hazelnut
500 g cream cheese
200 g heavy cream
85 g sugar
1 Tbsp vanilla extract
For the topping:
170 g dark chocolate
200 g heavy cream
Ferrero Rocher chocolates, to decorate
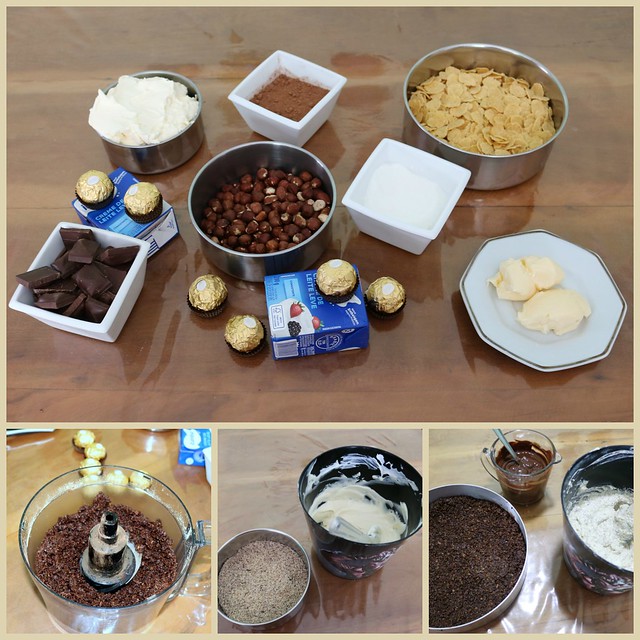
Start by making the base: in the food processor/blender, finely process the corn flakes. Add the melted butter and the cocoa powder and mix well. Cover the bottom of a 10-inch round springform pan with the crust, pressing well, and place it in the fridge to firm up. You don’t need to butter your pan, as the crust is buttery enough.
While the crust is in the fridge, place the hazelnuts on a baking sheet and roast them in a pre-heated oven. The process takes about 15 minutes. Every now and then, shake the baking sheet so that the hazelnuts don’t burn. You’ll know they are ready when the kitchen is smelling of hazelnuts 😀
Place the hot hazelnuts straight on the blender and blend WELL, until it becomes a paste. This is a lengthy process: Jota and I weren’t willing to wait that long, so we just ground them up, it was good! #truestory
In a bowl, mix the hazelnuts with the cream cheese, 200 g of cream, vanilla, and sugar, until it is nicely mixed. I mixed the cream cheese with the cream first, with a spatula, and then added the remaining ingredients of the filling, but that was just because I didn’t want to get the mixer dirty! 😀 Pour this cream over the cold crust, then cover your pan with plastic wrap and put it back in the fridge to firm up.
Meanwhile, place the cream and dark chocolate in a small pan over low heat (or a bain-marie if you’re more patient than I am), stirring well until all the chocolate is melted. Let it cool down a bit and cover the cheesecake with the ganache. Decorate with the Ferrero Rocher chocolates, put it back on the fridge for at least 30 minutes, and serve!
Chocolate and Yoghurt Muffins
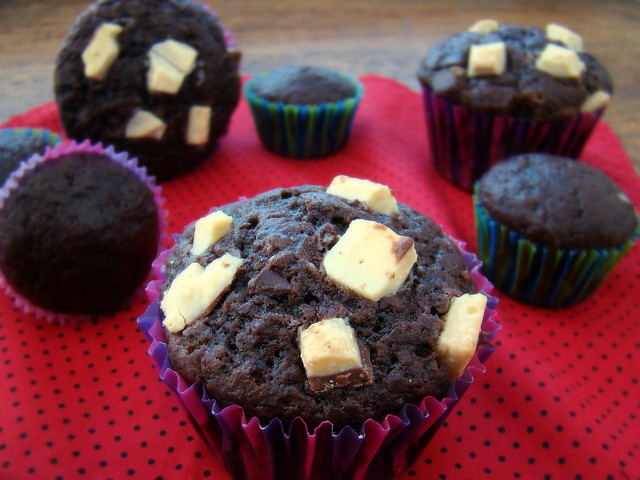
To end our Muffin Tertulias, nothing better than a VERY CHOCOLATY chocolate muffin – there’s cocoa and chocolate in the recipe! In addition, as the recipe calls for yoghurt, these are very soft. In fact, they were tastier on the second day!
The only part that takes a little bit of work is chopping the chocolate! I use normal chocolate, because I can’t find decent chocolate chips (only those with hydrogenated fat, ewwww). If you find decent chocolate chips, your muffins will be even prettier!
This recipe yields A LOT: I got 12 normal muffins and 15 mini-muffins! I think it would yield 16-18 normal-sized muffins .
You’ll need:
2 cups all-purpose flour
1 cup sugar
3/4 cups dark chocolate chips – I’ll add more next time!
1/2 cup cocoa powder
1 tsp baking soda
1 tsp vanilla extract
1 egg
1 cup whole-fat unsweetened yoghurt
1/2 cup milk
1/2 cup vegetable oil
1/4 cup white chocolate chips, for decorating

This is the easiest of all the recipes in this series – we don’t even need to melt the butter! 🙂
In the first bowl (the smallest), mix the dry ingredients. In the second bowl (a bigger one that can fit all the ingredients), mix the wet ingredients. Combine the dry and wet mixtures with a rubber spatula. As always, don’t mix too much – muffin batter really is a little lumpier than cake batter, so just mix until you can’t see flour specks anymore!
Fill the muffin cups, always to only 3/4 full. Sprinkle a few white chocolate chips on the top and bake for 20 minutes, or until they pass the toothpick test! 🙂
Let them cool down on a rack and CHOW DOWN!
